WireGuard Windows Client
The first thing we will do is download the client for Windows from the WireGuard website. Once installed we will proceed to configure our tunnel, for this we will click on “Add Tunnel” -> “Add empty tunnel…”:
A window will open with the public key of our Windows and the private key (do not delete the private key):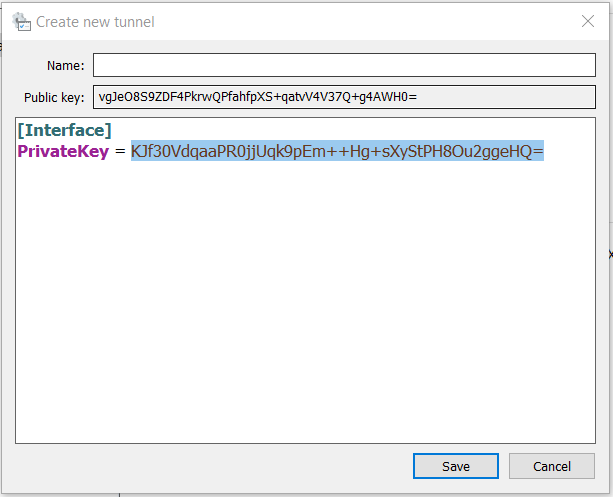
Before filling in the configuration we will make some clarifications about AllowedIPs, this variable is used to route traffic through the VPN we can choose several options:
- Route only private traffic: AllowedIPs = 10.0.8.0/24, 10.20.10.0/24
- Route private traffic and any public Clouding IPs: AllowedIPs = 10.0.8.0/24, 10.20.10.0/24, 46.183.112.0/21,185.166.212.0/22,85.208.20.0/22,185.253.152.0/22,185.254.2204.
- Route all traffic: AllowedIPs = 0.0.0.0/0
Now we will proceed to configure our VPN taking into account these variables:
- Interface > Private Key: we will leave the value that appeared to us when we started to create the tunnel.
- Interface > Addreess: we will indicate the IP that we want the VPN to assign us.
- Peer > PublicKey: we will indicate the public key of our server, the one we have generated in "WireGuard Configuration".
- Peer > AllowedIPs: we will indicate the traffic that we want to route through the VPN.
- Peer > EndPoint: we will indicate the public IP of our WireGuard server and the port configured in "WireGuard Configuration".
The configuration file would look like this:
[Interface]
PrivateKey = KJf30VdqaaPR0jjUqk9pEm++Hg+sXyStPH8Ou2ggeHQ=
Address = 10.0.8.10/24

[Peer]
PublicKey = 78MlX8LqV/SNpfvOrrD3nhJmBo0cGtHD94PimCGXSCE=
AllowedIPs = 10.0.8.0/24, 10.20.10.0/24
Endpoint = 185.254.204.xxx:51820
We will save the changes and now we will proceed to register the client on our server indicating the public key of our Windows:
# wg set wg0 peer vgJeO8S9ZDF4PkrwQPfahfpXS+qatvV4V37Q+g4AWH0= allowed-ips 10.0.8.10
Now we can activate our VPN with the activate button (the keys in these screenshots do not correspond to the previous configuration

WireGuard Linux or MacOS client
To configure our VPN on Linux or MacOS, the steps are quite similar, we can also download the MacOS client from the APP Store. If we want to configure the VPN from the command line, the steps are very similar to the configuration of the server.
The first thing we will do is generate our public and private key for our pc with:
# wg genkey | tee /etc/wireguard/privatekey | wg pubkey | tee /etc/wireguard/publickey
Now that we have our keys created we can proceed to configure a network interface for WireGuard, for this we will create a configuration file:
# vi /etc/wireguard/wg0.conf
We will add the following content:
[Interface]
PrivateKey = KJf30VdqaaPR0jjUqk9pEm++Hg+sXyStPH8Ou2ggeHQ=
Address = 10.0.8.10/24

[Peer]
PublicKey = 78MlX8LqV/SNpfvOrrD3nhJmBo0cGtHD94PimCGXSCE=
AllowedIPs = 10.0.8.0/24, 10.20.10.0/24
Endpoint = 185.254.204.xxx:51820
The configuration file is like the Windows one, we can choose which IP we want to use and which ranges we want to route. In Peer we have to indicate the public key of our WireGuard server and in Interface the private key of our PC.
We will save the changes and now we will proceed to register the client on our server indicating the public key of our PC
# wg set wg0 peer vgJeO8S9ZDF4PkrwQPfahfpXS+qatvV4V37Q+g4AWH0= allowed-ips 10.0.8.10
Now we can activate or deactivate our VPN with:
# wg-quick up wg0
# wg-quick down wg0
